|
|
0. 阅读完本文你将会
- 使用@ConfigurationProperties从配置文件中获取属性
- 自定义属性转换器
- 了解@ConfigurationProperties与@Value的区别
- 探究@ConfigurationProperties背后的源码运作
1. 前言
我们使用Spring框架的时候,经常会从配置文件中获取配置属性,比如发送邮件的时候,需要获取收发件人以及邮箱服务器地址和端口号。
那么本文将会介绍如何获取配置属性这样的小知识点,并做一定的延申。
2. 基础
2.1 准备工作
我们先在pom.xml中添加以下依赖项:
1. spring-boot-starter-parent
<parent>
<groupId>org.springframework.boot</groupId>
<artifactId>spring-boot-starter-parent</artifactId>
<version>2.6.7</version>
<relativePath/>
</parent>
2. spring-boot-starter-validation
用来验证定义的属性。
<dependency>
<groupId>org.springframework.boot</groupId>
<artifactId>spring-boot-starter-validation</artifactId>
</dependency>
2.2 定义配置类
官方文档建议我们最好将需要定义的属性分离出来,放在单独的POJO类里。
下面我们开始定义一个配置类:
package com.jay.mydemo.config;
import org.springframework.boot.context.properties.ConfigurationProperties;
import org.springframework.context.annotation.Configuration;
@Configuration
@ConfigurationProperties(prefix = &#34;mail&#34;)
public class MailConfigProperties {
private String hostName;
private int port;
private String from;
// default getters and setters
}
我们使用了@Configuration,这样Spring就会在应用上下文中创建一个对应的Spring Bean。如果我们不使用这个注解,也可以在Application类中添加以下注解。
@EnableConfigurationProperties(MailConfigProperties.class)
@ConfigurationProperties中定义了前缀mail。Spring会自动将POJO类与属性文件中前缀为mail的属性绑定。
Spring对绑定的属性比较宽松,比如以下的属性名都会绑到hostName上:
mail.hostName
mail.hostname
mail.host_name
mail.host-name
mail.HOST_NAME
我们可以使用下面这个简单的属性文件来对应POJO类:
mail.hostname=smtp.163.com
mail.port=25
mail.from=jay.xu@example.com
当然,从Spring Boot 2.2开始,我们已经不再需要使用@Component、@Configuration来注释配置类,同样也不需要@EnableConfigurationProperties。
“ Configuration properties scanning was enabled by default in Spring Boot 2.2.0 but as of Spring Boot 2.2.1 you must opt-in using @ConfigurationPropertiesScan.
” 因为Spring会通过类路径的扫描自动注册@ConfigurationProperties类。
你需要做的是在Application类中使用@ConfigurationPropertiesScan注解来扫描配置类的包地址,如:
@ConfigurationPropertiesScan(&#34;com.jay.mydemo.config&#34;)
2.3 属性嵌套
我们创建一个MailCrendential类:
package com.jay.mydemo.config;
public class MailCrendential {
private String username;
private String password;
// default getters and setters
}
然后再更新MailConfigProperties类,在其中我们加入一个List、一个Map以及MailCrendential。
private List<String> recipients;
private Map<String, String> headers;
private MailCrendential mailCrendential;
与此同时,我们更新application.properties:
# mail props
## basic
mail.hostname=smtp.163.com
mail.port=25
mail.from=jay.xu@example.com
## recipient list
mail.recipients[0]=recipients0@example.com
mail.recipients[1]=recipients1@example.com
## header map
mail.headers.redelivery=true
mail.headers.secure=true
## object
mail.mailCrendential.username=jayxu
mail.mailCrendential.password=password
做到这一步,我们可以尝试创建一个测试类来打印看看配置是否无误。
package com.jay.mydemo;
import com.jay.mydemo.config.MailConfigProperties;
import org.junit.jupiter.api.Test;
import org.springframework.beans.factory.annotation.Autowired;
import org.springframework.boot.context.properties.ConfigurationPropertiesScan;
import org.springframework.boot.test.context.SpringBootTest;
@SpringBootTest
class MydemoApplicationTests {
@Autowired
MailConfigProperties mailConfigProperties;
@Test
void testMailConfigProperties() {
System.out.println(mailConfigProperties);
}
}
输出如下:
MailConfigProperties{hostName=&#39;smtp.163.com&#39;, port=25, from=&#39;jay.xu@example.com&#39;, recipients=[recipients0@example.com, recipients1@example.com], headers={redelivery=true, secure=true}, mailCrendential=MailCrendential{username=&#39;jayxu&#39;, password=&#39;password&#39;}}
2.4 使用在@Bean方法上
除了上面的用法之外,当我们用到第三方类或者无法直接改动原有的类,我们可以将@ConfigurationProperties用在@Bean注解的方法上。
请看这个例子,先创建一个&#34;第三方类&#34;:
package com.jay.mydemo.config;
public class ThirdPartyItem {
private String name;
private String description;
// default getters and setters
}
然后我们创建一个配置类用来存放这些“第三方类”的Bean:
package com.jay.mydemo.config;
import org.springframework.boot.context.properties.ConfigurationProperties;
import org.springframework.context.annotation.Bean;
import org.springframework.context.annotation.Configuration;
@Configuration
public class ConfigProperties {
@Bean
@ConfigurationProperties(prefix = &#34;thirdpartyitem&#34;)
public ThirdPartyItem thirdPartyItem(){
return new ThirdPartyItem();
}
}
这样我们就可以在无法修改第三方类的情况下依然可以将其作为配置Bean使用。
3. 进阶
3.1 属性验证
我们可以在配置类中加入属性验证。
@Configuration
@ConfigurationProperties(prefix = &#34;mail&#34;)
@Validated
public class MailConfigProperties {
@NotBlank
private String hostName;
@Min(1048)
@Max(6475)
private int port;
@Pattern(regexp = &#34;^[a-z0-9._%+-]+@[a-z0-9.-]+\\.[a-z]{2,6}$&#34;)
private String from;
// . . .
}
这样的验证使得代码更加简洁,如果验证失败,那么应用就会启动失败,会报下面的错:
***************************
APPLICATION FAILED TO START
***************************
Description:
Binding to target org.springframework.boot.context.properties.bind.BindException: Failed to bind properties under &#39;mail&#39; to com.jay.mydemo.config.MailConfigProperties$$EnhancerBySpringCGLIB$$89aa73c0 failed:
Property: mail.hostName
Value:
Origin: class path resource [application.properties] - 4:0
Reason: 不能为空
3.2 属性转换
我们可以看一个Duration类的例子。 首先我们定义一个含有Duration类型字段的配置类:
package com.jay.mydemo.config;
import java.time.Duration;
@ConfigurationProperties(prefix = &#34;conversion&#34;)
public class ConversionConfigProperties {
private Duration defaultTime;
private Duration nanoTime;
// default getters and setters
}
属性文件中加入以下行:
# duration
conversion.defaultTime=8
conversion.nanoTime=8ns
打印出结果:
ConversionConfigProperties{defaultTime=PT0.008S, nanoTime=PT0.000000008S}
所以ConversionConfigProperties里已经包含了8毫秒,8纳秒。除此之外,d,h,m,s也支持,分别代表天,小时,分钟,秒。
当然你也可以不写时间,用上@DurationUnit即可:
@DurationUnit(ChronoUnit.HOURS)
private Duration hourTime;
对应的属性文件:
duration.hourTime=8
这样做是不是很方便,省得你数着指头做时间换算了。
类似于Duration的还有DataSize,你可以用它来方便地定义数据大小——B,KB,MB,GB,TB,用法在此不再赘述。
3.3 自定义属性转换器
我们也可以自定义一个属性转换器——将属性转换成一个指定class。
我们先来创建一个简单类Book:
package com.jay.mydemo.config;
public class Book {
private String name;
private double price;
private String description;
// default getters and setters
}
在属性文件中我们添加下面这行
conversion.book=java,88.00,java programming
并且在ConversionConfigProperties加上
private Book book;
然后我们来定义自己的属性转换器:
实现Converter并且使用@ConfigurationPropertiesBinding注解。
package com.jay.mydemo.config;
import org.springframework.boot.context.properties.ConfigurationPropertiesBinding;
import org.springframework.core.convert.converter.Converter;
import org.springframework.stereotype.Component;
@Component
@ConfigurationPropertiesBinding
public class BookConverter implements Converter<String, Book> {
@Override
public Book convert(String source) {
String[] data = source.split(&#34;,&#34;);
Book book = new Book();
book.setName(data[0]);
book.setPrice(Double.parseDouble(data[1]));
book.setDescription(data[2]);
return book;
}
}
这样自定义的属性转换器便大功告成了!
我们可以测试一下,打印出以下结果:
Book{name=&#39;java&#39;, price=88.0, description=&#39;java programming&#39;}
3.4 @ConfigurationProperties与@Value比较
除了@ConfigurationProperties注解可以获取配置文件中属性值,我们还可以使用@Value来一个一个地注解字段。
请看示例:
package com.jay.mydemo.config;
import org.springframework.beans.factory.annotation.Value;
import org.springframework.boot.context.properties.ConfigurationProperties;
import org.springframework.context.annotation.Configuration;
import org.springframework.validation.annotation.Validated;
import javax.validation.constraints.Max;
import javax.validation.constraints.Min;
import javax.validation.constraints.NotBlank;
import javax.validation.constraints.Pattern;
import java.util.List;
import java.util.Map;
@Configuration
public class MailConfigProperties2 {
// SpEL表达式
@Value(&#34;#{ &#39;${mail.hostname}&#39;.length() > 0 ? &#39;${mail.hostname}&#39; : &#39;smtp.163.com&#39;}&#34;)
private String hostName;
// 字面量
@Value(&#34;25&#34;)
private int port;
// 属性key
@Value(&#34;${mail.from}&#34;)
private String from;
// default getters and setters
}
在这个改写的MailConfigProperties2中,我们可以看出@Value的常用方式,下表是两个注解之间的主要区别:
| @ConfigurationProperties | @Value | | 注入配置文件中的属性 | 批量 | 单个指定 | | 松散语法 | 支持 | 不支持 | | SpEL | 不支持 | 支持 | | JSR303数据校验 | 支持 | 不支持 | | 复杂类型封装 | 支持 | 不支持 |
如果我们需要使用SpEL表达式,我们可以使用@Value。除此之外,我们都应该使用@ConfigurationProperties, 它更方便全能。
即使是只是在某个业务逻辑中偶尔使用一次来获取配置信息,也推荐使用@ConfigurationProperties,因为@Value零散,不易管理,注解属性的时候还要保证前缀和属性名书写无误。
4. 源码探究
在上文中,我们已经学会了@ConfigurationProperties的进阶用法,那么这一节,我们来看看源码吧。
1. 进入ConfigurationProperties
先点开@ConfigurationProperties的源码。
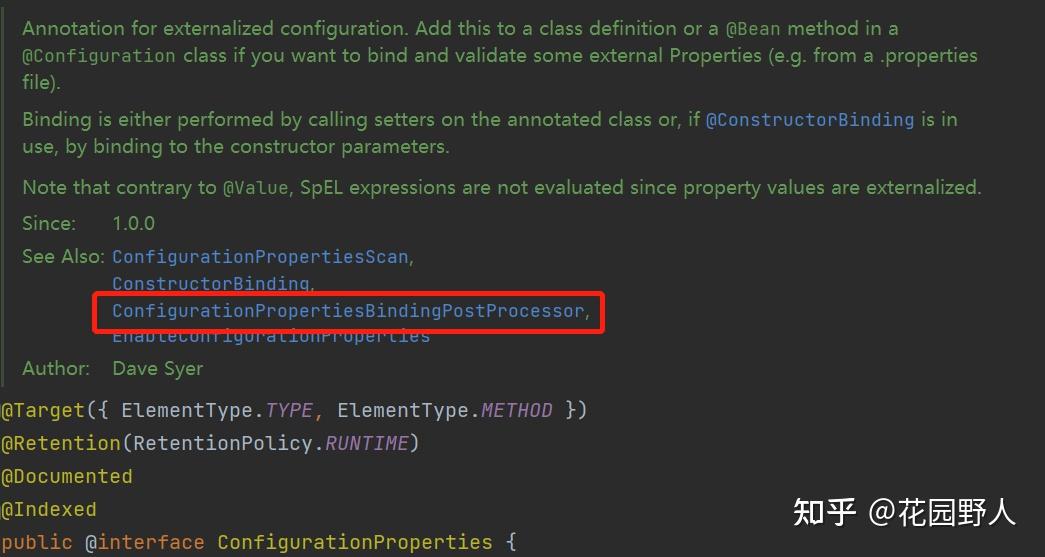
Spring的许多功能是通过BeanPostProcessor (后置处理器)来实现的。后置处理器的作用就是在Bean对象实例化和依赖注入完毕后,在调用初始化方法前后添加我们自己的逻辑。
2. 进入ConfigurationPropertiesBindingPostProcessor
而我们从源码的注释中也可以发现ConfigurationPropertiesBindingPostProcessor支持了@ConfigurationProperties的运作。
点开该Processor的源码,我们可以发现其实现了BeanPostProcessor的核心方法之一postProcessBeforeInitialization方法。
@Override
public Object postProcessBeforeInitialization(Object bean, String beanName) throws BeansException {
bind(ConfigurationPropertiesBean.get(this.applicationContext, bean, beanName));
return bean;
}
谁调用了这个方法呢?
3. 进入调用者AbstractAutowireCapableBeanFactory
通过IDE,我们可以发现调用者就是AbstractAutowireCapableBeanFactory :

@Override
public Object applyBeanPostProcessorsBeforeInitialization(Object existingBean, String beanName)
throws BeansException {
Object result = existingBean;
//遍历该工厂创建的后置处理器
for (BeanPostProcessor processor : getBeanPostProcessors()) {
//核心操作:后置处理器做对应的初始化前的处理
Object current = processor.postProcessBeforeInitialization(result, beanName);
if (current == null) {
return result;
}
result = current;
}
return result;
}
postProcessBeforeInitialization调用完之后,我们就回到了ConfigurationPropertiesBindingPostProcessor对应的方法。
4. 继续探究postProcessBeforeInitialization方法
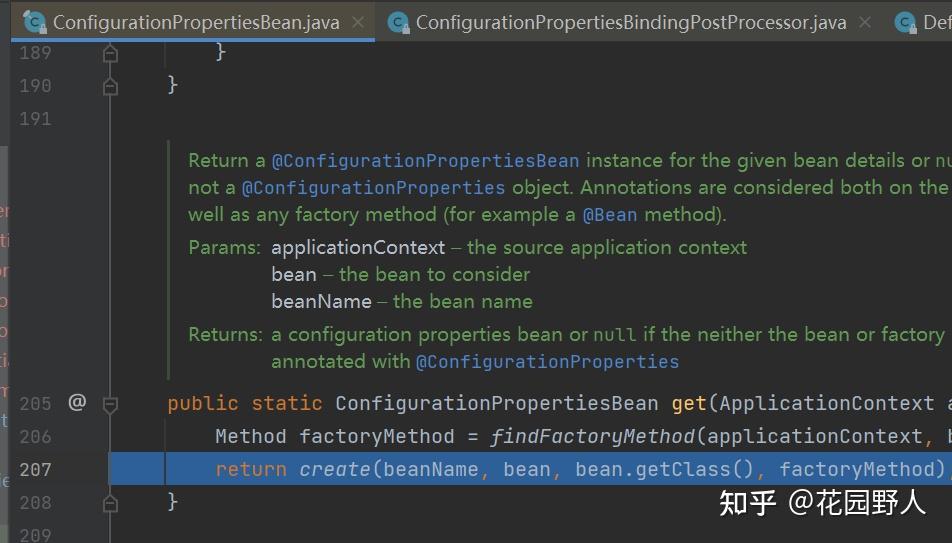
我们点开ConfigurationPropertiesBean.get(this.applicationContext, bean, beanName),发现这样一个方法:
public static ConfigurationPropertiesBean get(ApplicationContext applicationContext, Object bean, String beanName) {
Method factoryMethod = findFactoryMethod(applicationContext, beanName);
return create(beanName, bean, bean.getClass(), factoryMethod);
}
结合这个方法的注释(不得不说官方的注释确实很详细,用词也很精准,值得学习):
“ Return a @ConfigurationPropertiesBean instance for the given bean details or null if the bean is not a @ConfigurationProperties object. Annotations are considered both on the bean itself, as well as any factory method (for example a @Bean method).
Params: applicationContext – the source application context
bean – the bean to consider
beanName – the bean name
Returns: a configuration properties bean or null if the neither the bean or factory method are annotated with @ConfigurationProperties
” 我们不难看出ConfigurationPropertiesBean.get(ApplicationContext applicationContext, Object bean, String beanName)是用来返回一个ConfigurationPropertiesBean,也就是我们定义的配置类的Bean,既可以是直接注解在配置类本身的也可以是注解在@Bean方法上的(其实就是上文提到的@ConfigurationProperties的两种用法)。当然它也可以返回一个null,如果它没用@ConfigurationProperties注解。
5. 进一步分析
我们打上断点,debug进行分析:
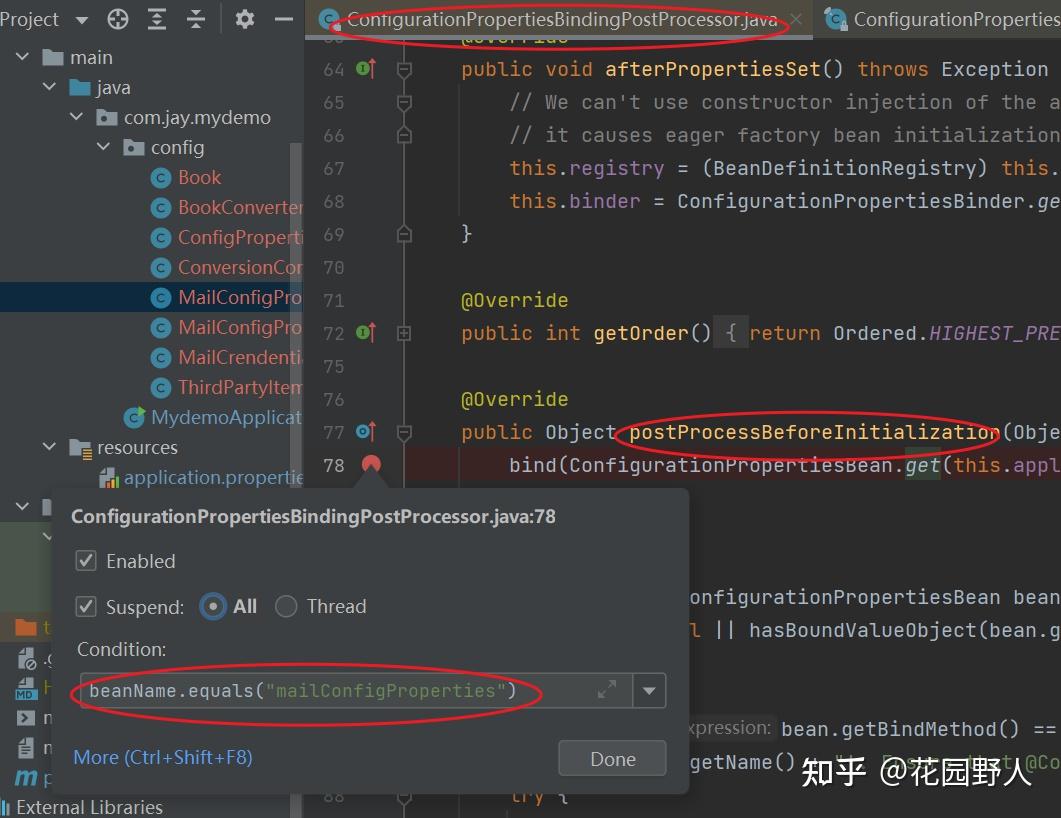
查看变量表,现在传入的是我们想要的mailConfigProperties:
this = {ConfigurationPropertiesBindingPostProcessor@3404}
bean = {MailConfigProperties$$EnhancerBySpringCGLIB$$c72a3e93@4462} &#34;MailConfigProperties{hostName=&#39;null&#39;, port=0, from=&#39;null&#39;, recipients=null, headers=null, mailCrendential=null}&#34;
beanName = &#34;mailConfigProperties&#34;
this.applicationContext = {AnnotationConfigApplicationContext@3405} &#34;org.springframework.context.annotation.AnnotationConfigApplicationContext@5f77d0f9, started on Mon Apr 25 09:37:19 CST 2022&#34;
继续往下走
图中的变量factoryMethod值为null,这是因为mailConfigProperties是注解在类上,而非@Bean方法上。
点进create()方法

查看变量表:
name = &#34;mailConfigProperties&#34;
instance = {MailConfigProperties$$EnhancerBySpringCGLIB$$3101bff0@3488} &#34;MailConfigProperties{hostName=&#39;null&#39;, port=0, from=&#39;null&#39;, recipients=null, headers=null, mailCrendential=null}&#34;
type = {Class@3289} &#34;class com.jay.mydemo.config.MailConfigProperties$$EnhancerBySpringCGLIB$$3101bff0&#34;
factory = null
annotation = {$Proxy41@4419} &#34;@org.springframework.boot.context.properties.ConfigurationProperties(ignoreInvalidFields=false, ignoreUnknownFields=true, prefix=&#34;mail&#34;, value=&#34;mail&#34;)&#34;
validated = {$Proxy28@4426} &#34;@org.springframework.validation.annotation.Validated(value=[])&#34;
annotations = {Annotation[2]@4434}
bindType = {ResolvableType@4439} &#34;com.jay.mydemo.config.MailConfigProperties$$EnhancerBySpringCGLIB$$3101bff0&#34;
bindTarget = {Bindable@4456} &#34;[Bindable@5d10455d type = com.jay.mydemo.config.MailConfigProperties$$EnhancerBySpringCGLIB$$3101bff0, value = &#39;provided&#39;, annotations = array<Annotation>[@org.springframework.boot.context.properties.ConfigurationProperties(ignoreInvalidFields=false, ignoreUnknownFields=true, prefix=&#34;mail&#34;, value=&#34;mail&#34;), @org.springframework.validation.annotation.Validated(value=[])]]&#34;
我们可以看出org.springframework.boot.context.properties.ConfigurationPropertiesBean#create(String name, Object instance, Class<?> type, Method factory)最终创建了这样一个ConfigurationPropertiesBean。
它的name是mailConfigProperties,目前还没有赋值,注解属性是ignoreInvalidFields=false, ignoreUnknownFields=true, prefix=&#34;mail&#34;, value=&#34;mail&#34;,它包含了验证环节,对应了我们的@Validated注解。
“ ignoreInvalidFields, 默认为false。当值是false的时候,表示不忽视无效的字段。一般是指类型错误的字段,比如Java类里字段类型是int,但是配置文件中是字符串,那么就会启动报错。
”
“ ignoreUnknownFields,默认为true,意思是忽视未知、多余的字段,比如配置文件中有,但是配置类中未使用的字段,建议默认即可,因为所谓未知、多余的字段可能用在其他地方。
” 6. 再看bind方法
现在让我们重回bind(ConfigurationPropertiesBean.get(this.applicationContext, bean, beanName));
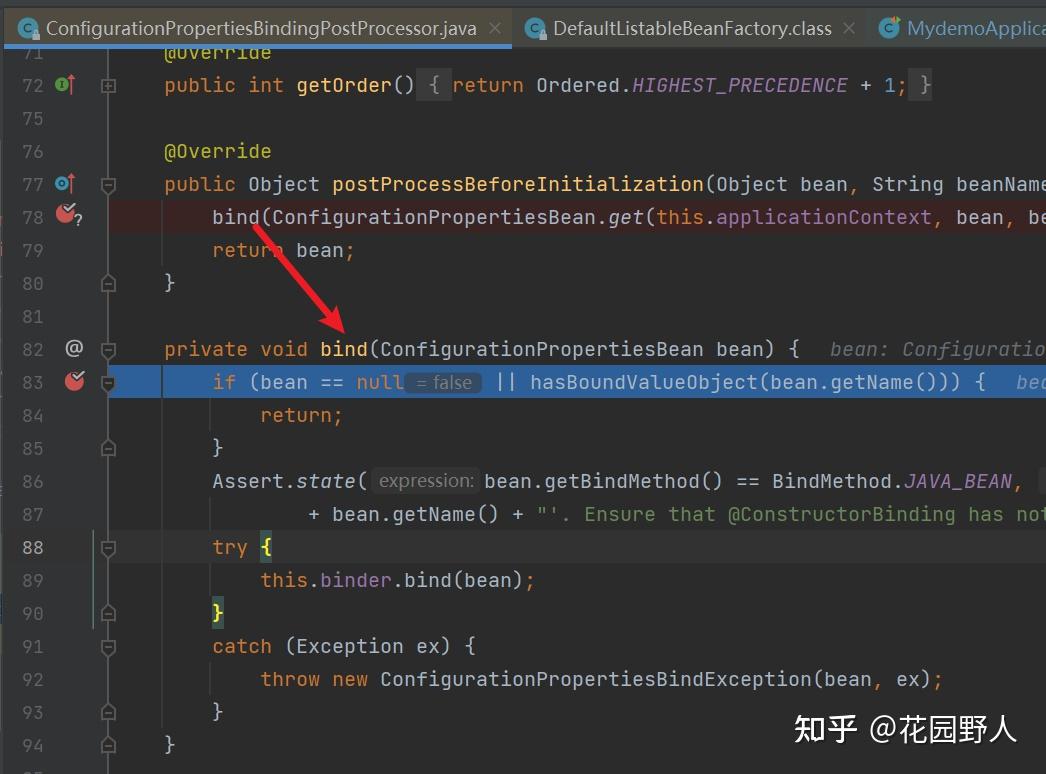
if (bean == null || hasBoundValueObject(bean.getName())) {
return;
}
当bean为null或者此时的bean已绑定对象都直接返回。
7. 进入hasBoundValueObject(bean.getName())
该方法的源码如下:
private boolean hasBoundValueObject(String beanName) {
return this.registry.containsBeanDefinition(beanName) && BindMethod.VALUE_OBJECT
.equals(this.registry.getBeanDefinition(beanName).getAttribute(BindMethod.class.getName()));
}
- this.registry.containsBeanDefinition(beanName)
这里返回true,因为mailConfigProperties这个Bean在实例化就已经存在。
- this.registry.getBeanDefinition(beanName).getAttribute(BindMethod.class.getName())
this.registry.getBeanDefinition(beanName)获取了这样一个ScannedGenericBeanDefinition
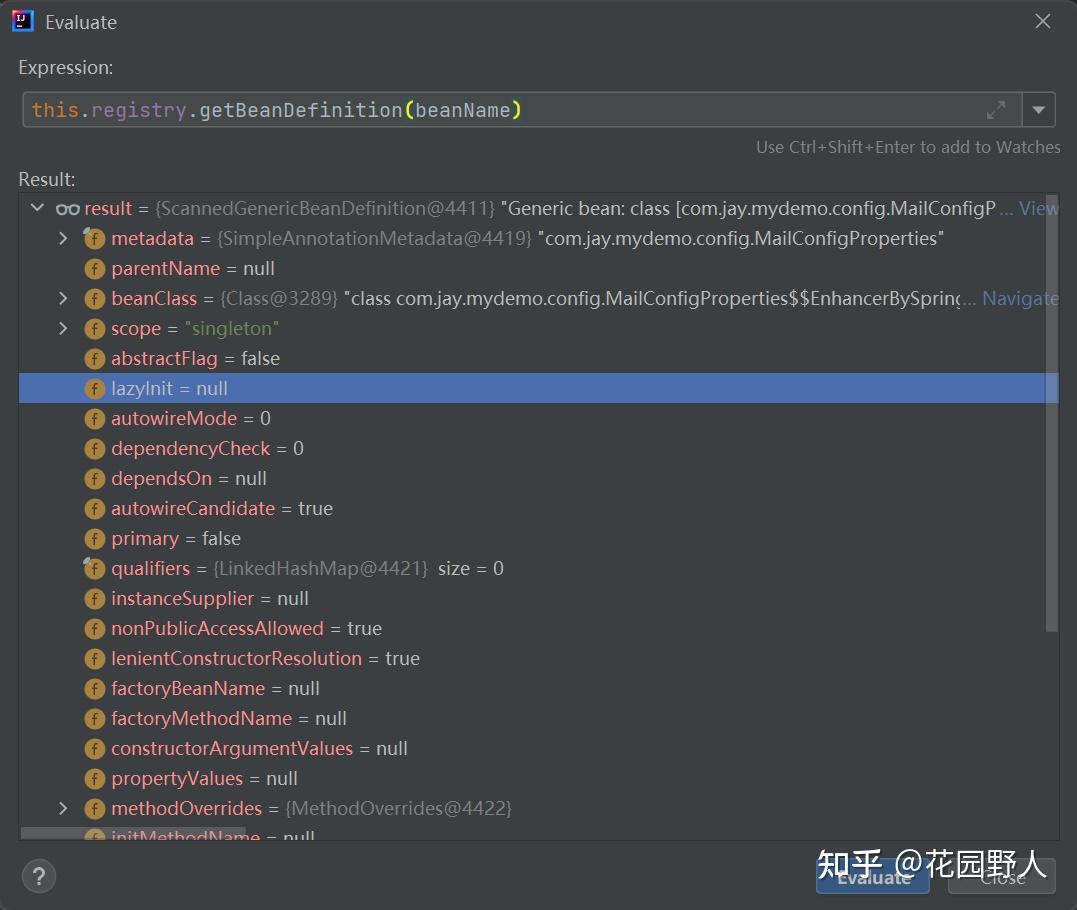
“ ScannedGenericBeanDefinition继承自 GenericBeanDefinition ,并实现了 AnnotatedBeanDefinition 接口。这个 BeanDefinition 用来描述标注 @Component 注解的 Bean,其派生注解如 @Service、@Controller 也同理。BeanDefinition 主要是用来描述 Bean,其存储了 Bean 的相关信息。
” 回到代码层面,因为result还没有绑定配置文件中的属性,所以这边getAttribute()的结果为null,那么最终整个布尔表达式的结果也就是true && false = false。
8. 绑定this.binder.bind(bean);
就是在这个方法里,完成了配置类和配置文件属性的绑定,有兴趣的小伙伴可以继续探究下去哦。
9. 总结
经过以上的源码探索步骤,我们可以简单地总结下@ConfigurationProperties的流程:
- @ConfigurationProperties 的后置处理器ConfigurationPropertiesBindingPostProcessor实现了BeanPostProcessor的postProcessBeforeInitialization方法,会在Bean初始化之前被调用。
- 后置处理器会读取@ConfigurationProperties注解的对象,获取配置文件中的prefix,和注解对象的类成员变量,然后递归将配置属性赋值给类成员变量。
|
|


 发表于 2022-9-23 12:39:34